Blogs & Blinkies


Promote Your Page Too
Like my Designs by Sarah Facebook Page and get an exclusive freebie! Freebie changes often, so check back!
Pinning!
Monday, February 28, 2011
New Kits!
I have two new kits of mine that need their own little time in the spot light! Here's what I've recently released only at PMTw/S!

My uber fabulous bloggie was recently re-dressed with my brand new french inspired kit, find it HERE!

Here's a perfectly petite and deliciously cozy kit for those heated nights in the summer! Find it HERE!


Monday, February 21, 2011
New Goodies + Tuts

Here is a new springy and colorful kit for all your bright projects! Find Spring Fling HERE!

Tutorial HERE


Find this kick ass, rockin', punky and totally chic emo kit, Emo Princess HERE!
 Tutorial here

Our amazing tut writer/template designer Cakes created this AWESOME template based on my kit! :)
Template here


New Kit + Tuts! Adoraskull
I was completely compelled to make this kit! It came flyin' out of me! Gotta love creativity like that huh?! heheh!
Thanks for stoppin' by!


Wednesday, February 09, 2011
New Collab + PU Freebie + Tuts!
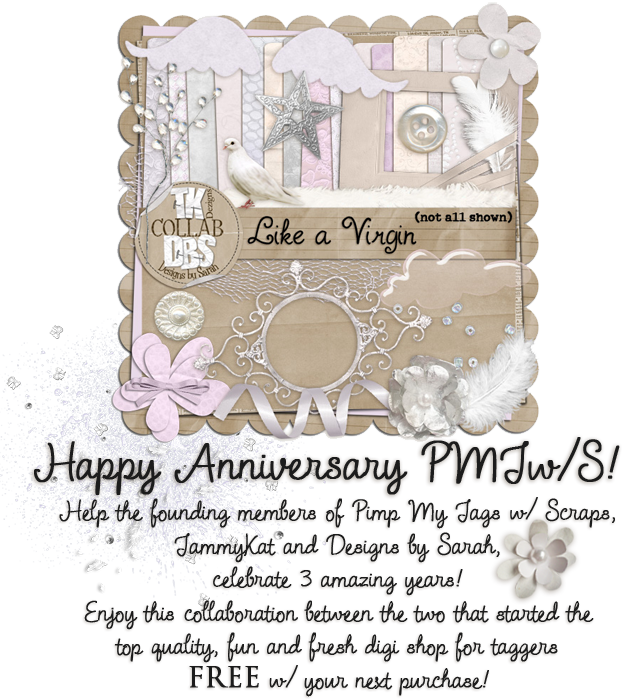
If you purchase from PMTw/S between 2-8 & 2-22, no matter their amount, you will get this awesome anniversary collab by Designs by Sarah and TammyKat Dezigns; Like a Virgin for FREE! Download links will arrive manually via e-mail therefore patience is required! Thanks for understanding!
I've also done up a PU freebie styles to coordinate with this special anniversary collab! They are for photoshop.


Tut HERE


Tuesday, February 08, 2011
New Collab, Tuts & PU FREEBIE!!
Want our very first store collab since taking on Chassity of PolkaDot Scraps?!
This collab is HUGE! and by 4 amazing designers- the designers of Pimp My Tags w/ Scraps!
(me included heheheh!)

Check out some of these amazing tutorials written with this awesome collab!


Monday, February 07, 2011
Emo Princess Tutorial
Howdy! Well, I was bitten by the tutorial writing bug once again! ;) I recently purchased this rockin' tube by Lady Mishka @ Pics for Design and HAD to design a kit to match her! She's such a cutie pie! So here's the kit preview, tutorial and everything else! Per usual, need to see things bigger? Click the image, it will take you to its original format, big 'n pretty for ya!
:)

This tutorial features a kit by myself called Emo Princess found HERE.

And the awesome artwork of Lady Mishka found HERE.

Ready to get started?! Got your supplies?! Well let's rock this tut! This tutorial was written on 2-7-11 and any similarity to any other tutorial is merely coincidence! ;) This all came from my noggin thank-you-very-much! I used Photoshop Cs3 to pimp out this tag! :) This tutorial was written for those with a working knowledge of your program of choice. All effects seen here can easily be re-created in your program of choice given that you know how to use your program well! If you want some tips and tricks in PS, check out my other tutorial I wrote: Sprinkles on my Toosh.
First things first... I opened a canvas of 700 X 700 px (can crop later), I grabbed my gawjuss tubbie and got to work. With photoshop, it's pretty awesome, you can click on your tube layer and holding down the mouse button, you can drag it onto your blank canvas. It's uber handy! Drag 'n drop that tube onto your blank canvas, and as you can see I added a drop shadow and chose a bright pink frame to go aside it...


Pretty pink frame! Position it to where you'd like it.
I grabbed a paper to go inside the frame, and opened it up, remembering to click on the paper, hold the mouse button down and drag it onto your taggie canvas! Easy peasy!

Once I get my paper resized properly and situated to where I want it, I click the magic wand, and click inside the frame, making sure I'm on the actual frame layer...

I went to SELECT > MODIFY > EXPAND and made the circle a wee larger than the actual opening of the frame... I expanded by 6 pixels...

Then back up to SELECT > INVERSE and on the actual paper layer, hit your DELETE button on your keyboard...


Now that your paper isn't peeking out from behind your frame, you can safely add a drop shadow to your frame! :)

I threw some black glittery splatter behind the frame and paper layers, and positioned it to where I wanted it...

I grabbed one of the tiara's from my kit, positioned it, gave it a tilt, added a nice drop shadow and grabbed a sparkle brush and gave the tiara some bling!

I grabbed my tube again, flipped it and positioned it under my frame layer but above my paper layer... I then went through the process of clicking inside the frame with the magic wand again, like I explained above. After expanding by 6 and inversing the expansion, I made sure I was on the right tube layer and hit delete on my keyboard! Poof! Extra overhanging tube part disappears! ;)

I then went to IMAGE > ADJUSTMENTS > DESATURATE and made the tube black 'n white.

I gave her black 'n white face/head a drop shadow and grabbed a few other bits 'n pieces from my kit, a bow and a flower, and positioned them like so...

I gave everything I just added a nice drop shadow for depth.. remember, please don't make your drop shadows too dark! That's a common mistake that ppl make when tagging... You want your tag to look realistic, so make it have a nice, soft, feathery shadow.
I then added the font Official Tyrant to my tag with is blocky, and full of attitude!
I grabbed a paper from my kit and clipped it to the big letters and gave it a stroke of 2 pixels white...


After giving the stroked big blocky letters a sweet little drop shadow to give that sticker effect, I grabbed the font 2 Peas Lady Like, typed in a brief message and gave it a slight glow of white to make it easier to see!

After you got everything where you want it, add your copyright information and enjoy your tag! Thanks for takin' a peek at this tutorial! Hope you liked it! :)
Subscribe to:
Posts (Atom)
About Me

Snag My Blinkie!


Personal CT Blog
I want to take a moment to personally thank anyone who's written a tutorial with my products from the past, in the present and in the future! THANK YOU!!! And a huge thank you to my talented, dedicated personal creative team! I owe you guys EVERYTHING!

PMTw/S CT Blog

Contact Me

